
More insights.
Subscribe to our newsletter.
Deep dives into design thinking, creative process, and the intersection of business and aesthetics.
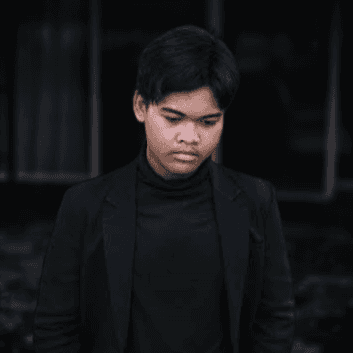
Cosplay photography is more than just snapping pictures of costumes—it's about capturing the spirit, emotion, and style of the characters. Whether you're photographing at conventions, on location, or in a studio, this beginner-friendly guide will help you take cosplay portraits that truly make an impact.
1. Understand the Character
Before you even lift your camera, learn about the character you're shooting:
What’s their personality? Are they fierce, playful, stoic, or mysterious?
What’s their story or background?
How do they pose or fight? Look at official artwork or in-game cutscenes.
📌 Tip: Watch videos or read source material to understand how to best direct the cosplayer in-character.
2. Communicate with the Cosplayer
A successful shoot starts with clear communication.
Ask about their preferred poses, character interpretation, and any do’s and don’ts.
Discuss location, themes, and editing style ahead of time.
Set expectations around turnaround time and image usage (especially for social sharing or portfolio use).
📌 Pro Tip: Build trust and collaboration. It’s a team effort between you and the cosplayer.
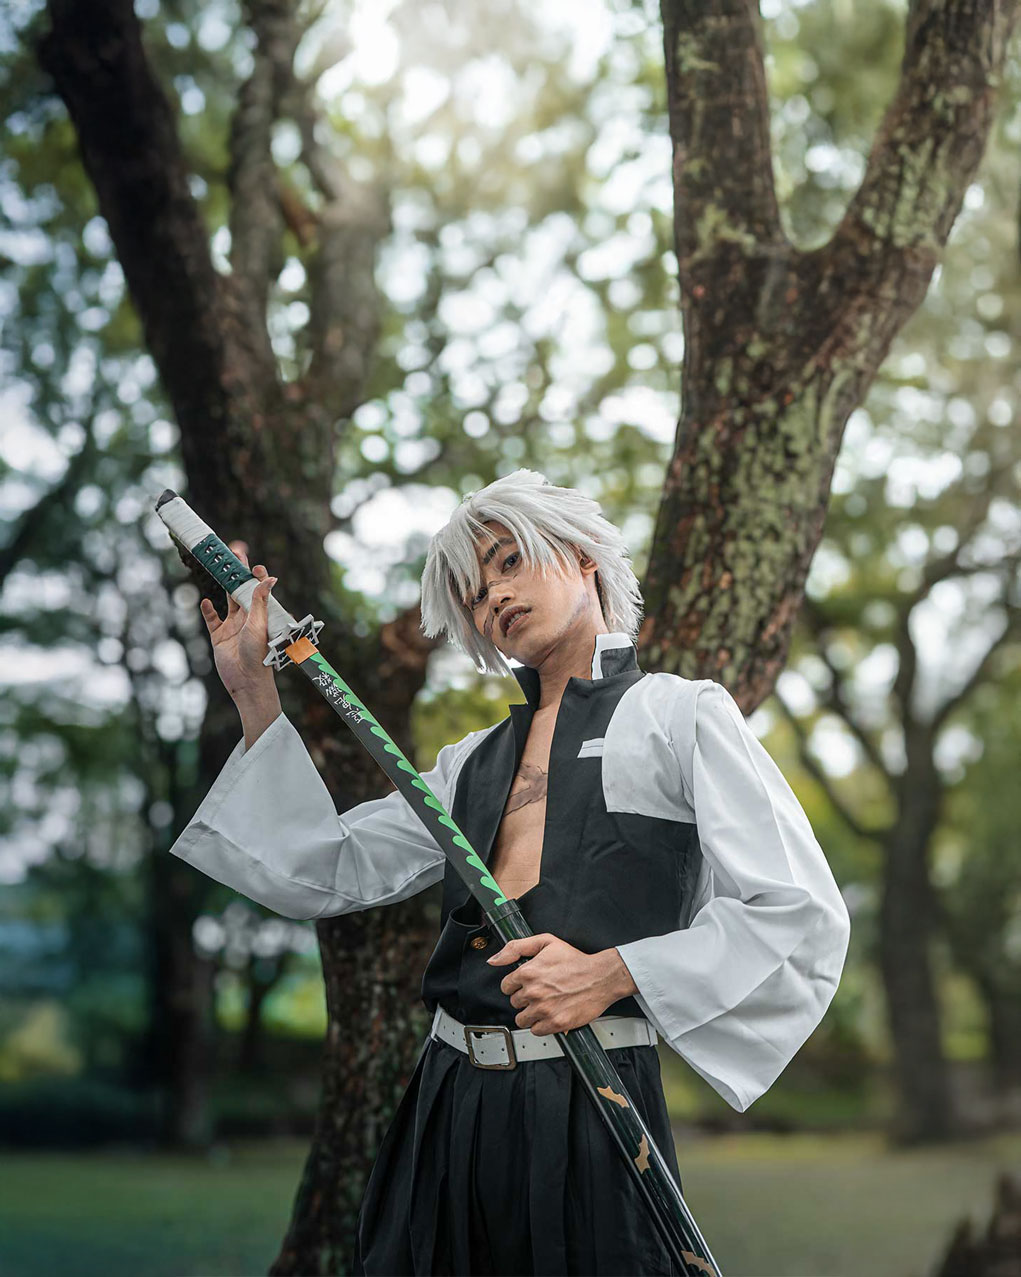
3. Choose the Right Location
Match the backdrop to the character:
Character TypeIdeal LocationsFantasy / MedievalForests, castles, ruins, old stone buildingsSci-Fi / CyberpunkUrban alleys, neon signs, industrial zonesSchool Anime / SliceCampuses, cafes, crosswalks, parksSuperheroesRooftops, cityscapes, gym-style studios
When location isn’t accurate, shoot with the intention to composite or blur backgrounds in post.
📌 Bonus: Even simple environments can work if you use lighting and depth creatively.
4. Use the Right Gear
Camera & Lenses
DSLR or Mirrorless with manual control.
Lens recommendations:
50mm f/1.8: Lightweight and versatile.
85mm f/1.8: Great for portraits and bokeh.
24-70mm f/2.8: Zoom flexibility for events or on-location.
Lighting
Natural light: Soft golden hour is best.
Flash or strobes: Useful for drama, rim light, or inside conventions.
Light modifiers: Use softboxes, reflectors, or even RGB LED lights for effects.
📌 Convention Tip: Bring a speedlight and collapsible diffuser for quick setups indoors.
5. Master Posing and Composition
Posing Tips
Recreate iconic poses from the character’s media.
Encourage in-character expressions (e.g., serious for warriors, shy for magical girls).
Use movement: Capes flowing, props in action, or dramatic stance transitions.
Composition Techniques
Use the rule of thirds or center composition to emphasize power.
Incorporate foreground objects like foliage, smoke, or props for depth.
Frame with architecture, doors, or environmental elements to “contain” the character visually.
📌 Always focus on the eyes—especially if the cosplay includes dramatic contacts or makeup.
6. Props, Details, and Angles Matter
Props
Feature props (swords, wands, gadgets) in creative ways.
Show action or close-ups of the weapon or object in use.
Details
Highlight craftsmanship: armor textures, embroidery, or makeup.
Shoot macro shots or tight crops of important costume pieces.
Angles
Low angles for powerful or villainous characters.
Eye-level for hero or “normal” characters.
Dutch angles (tilted frame) for action or tension.
📌 Pro Tip: Don’t be afraid to lie on the ground or shoot from unusual perspectives!
7. Capture Emotion and Storytelling
Cosplay photography isn't just about showing off the outfit—it's about telling a story.
Set up shots that hint at a scene or event.
Use facial expressions and body language to convey emotion.
Capture both posed and candid moments—sometimes the best shots are in-between.
📌 Bonus Idea: Create a short photo series that tells a visual narrative.
8. Edit with Style, Not Overkill
Basic Edits
Adjust exposure, contrast, and color balance.
Retouch skin gently—don't erase all texture.
Enhance costume details or background vibrancy.
Advanced Techniques (Optional)
Add special effects (e.g., smoke, fire, magic glow).
Use Photoshop for background replacement or compositing.
Color grade to match the anime/game aesthetic.
📌 Editing Rule: Style your edits to complement the character, not overshadow them.
9. Be Mindful of Convention Etiquette
If you’re shooting at a con:
Always ask before photographing.
Respect cosplayer comfort and space.
Don’t block walkways or shoot in restricted areas.
Avoid shooting minors without parental permission.
📌 Tip: Use offsite locations nearby for longer, uninterrupted shoots during or after the event.
10. Share and Tag Responsibly
Credit the cosplayer, makeup artist, and anyone else involved.
Ask the cosplayer how they want to be tagged on social media.
Only post what you’ve agreed upon—especially if edits are dramatic.
📌 Respect = Repeat Clients. Being professional helps grow your reputation in the cosplay community.
Conclusion
Cosplay photography is a unique blend of fan art, portraiture, and storytelling. With the right preparation, creative vision, and respect for the characters and cosplayers, you can create stunning images that go beyond costume showcases—they become epic portraits of beloved heroes and villains.
Cosplay photography is more than just snapping pictures of costumes—it's about capturing the spirit, emotion, and style of the characters. Whether you're photographing at conventions, on location, or in a studio, this beginner-friendly guide will help you take cosplay portraits that truly make an impact.
1. Understand the Character
Before you even lift your camera, learn about the character you're shooting:
What’s their personality? Are they fierce, playful, stoic, or mysterious?
What’s their story or background?
How do they pose or fight? Look at official artwork or in-game cutscenes.
📌 Tip: Watch videos or read source material to understand how to best direct the cosplayer in-character.
2. Communicate with the Cosplayer
A successful shoot starts with clear communication.
Ask about their preferred poses, character interpretation, and any do’s and don’ts.
Discuss location, themes, and editing style ahead of time.
Set expectations around turnaround time and image usage (especially for social sharing or portfolio use).
📌 Pro Tip: Build trust and collaboration. It’s a team effort between you and the cosplayer.
3. Choose the Right Location
Match the backdrop to the character:
Character TypeIdeal LocationsFantasy / MedievalForests, castles, ruins, old stone buildingsSci-Fi / CyberpunkUrban alleys, neon signs, industrial zonesSchool Anime / SliceCampuses, cafes, crosswalks, parksSuperheroesRooftops, cityscapes, gym-style studios
When location isn’t accurate, shoot with the intention to composite or blur backgrounds in post.
📌 Bonus: Even simple environments can work if you use lighting and depth creatively.
4. Use the Right Gear
Camera & Lenses
DSLR or Mirrorless with manual control.
Lens recommendations:
50mm f/1.8: Lightweight and versatile.
85mm f/1.8: Great for portraits and bokeh.
24-70mm f/2.8: Zoom flexibility for events or on-location.
Lighting
Natural light: Soft golden hour is best.
Flash or strobes: Useful for drama, rim light, or inside conventions.
Light modifiers: Use softboxes, reflectors, or even RGB LED lights for effects.
📌 Convention Tip: Bring a speedlight and collapsible diffuser for quick setups indoors.
5. Master Posing and Composition
Posing Tips
Recreate iconic poses from the character’s media.
Encourage in-character expressions (e.g., serious for warriors, shy for magical girls).
Use movement: Capes flowing, props in action, or dramatic stance transitions.
Composition Techniques
Use the rule of thirds or center composition to emphasize power.
Incorporate foreground objects like foliage, smoke, or props for depth.
Frame with architecture, doors, or environmental elements to “contain” the character visually.
📌 Always focus on the eyes—especially if the cosplay includes dramatic contacts or makeup.
6. Props, Details, and Angles Matter
Props
Feature props (swords, wands, gadgets) in creative ways.
Show action or close-ups of the weapon or object in use.
Details
Highlight craftsmanship: armor textures, embroidery, or makeup.
Shoot macro shots or tight crops of important costume pieces.
Angles
Low angles for powerful or villainous characters.
Eye-level for hero or “normal” characters.
Dutch angles (tilted frame) for action or tension.
📌 Pro Tip: Don’t be afraid to lie on the ground or shoot from unusual perspectives!
7. Capture Emotion and Storytelling
Cosplay photography isn't just about showing off the outfit—it's about telling a story.
Set up shots that hint at a scene or event.
Use facial expressions and body language to convey emotion.
Capture both posed and candid moments—sometimes the best shots are in-between.
📌 Bonus Idea: Create a short photo series that tells a visual narrative.
8. Edit with Style, Not Overkill
Basic Edits
Adjust exposure, contrast, and color balance.
Retouch skin gently—don't erase all texture.
Enhance costume details or background vibrancy.
Advanced Techniques (Optional)
Add special effects (e.g., smoke, fire, magic glow).
Use Photoshop for background replacement or compositing.
Color grade to match the anime/game aesthetic.
📌 Editing Rule: Style your edits to complement the character, not overshadow them.
9. Be Mindful of Convention Etiquette
If you’re shooting at a con:
Always ask before photographing.
Respect cosplayer comfort and space.
Don’t block walkways or shoot in restricted areas.
Avoid shooting minors without parental permission.
📌 Tip: Use offsite locations nearby for longer, uninterrupted shoots during or after the event.
10. Share and Tag Responsibly
Credit the cosplayer, makeup artist, and anyone else involved.
Ask the cosplayer how they want to be tagged on social media.
Only post what you’ve agreed upon—especially if edits are dramatic.
📌 Respect = Repeat Clients. Being professional helps grow your reputation in the cosplay community.
Conclusion
Cosplay photography is a unique blend of fan art, portraiture, and storytelling. With the right preparation, creative vision, and respect for the characters and cosplayers, you can create stunning images that go beyond costume showcases—they become epic portraits of beloved heroes and villains.